
Welp, it’s Tuesday.
Ever had those kind of days were everything goes wrong ? It’s usually a Monday. And yesterday was one of those days for me, first thing in the morning, my camera crapped out on me and I couldn’t get good pictures of my beautiful new kitchen for you guys.
So today is a total do-over ! Screw Monday anyway, let’s rock this Tuesday !!
The good news is, the kitchen looks awesooooome.
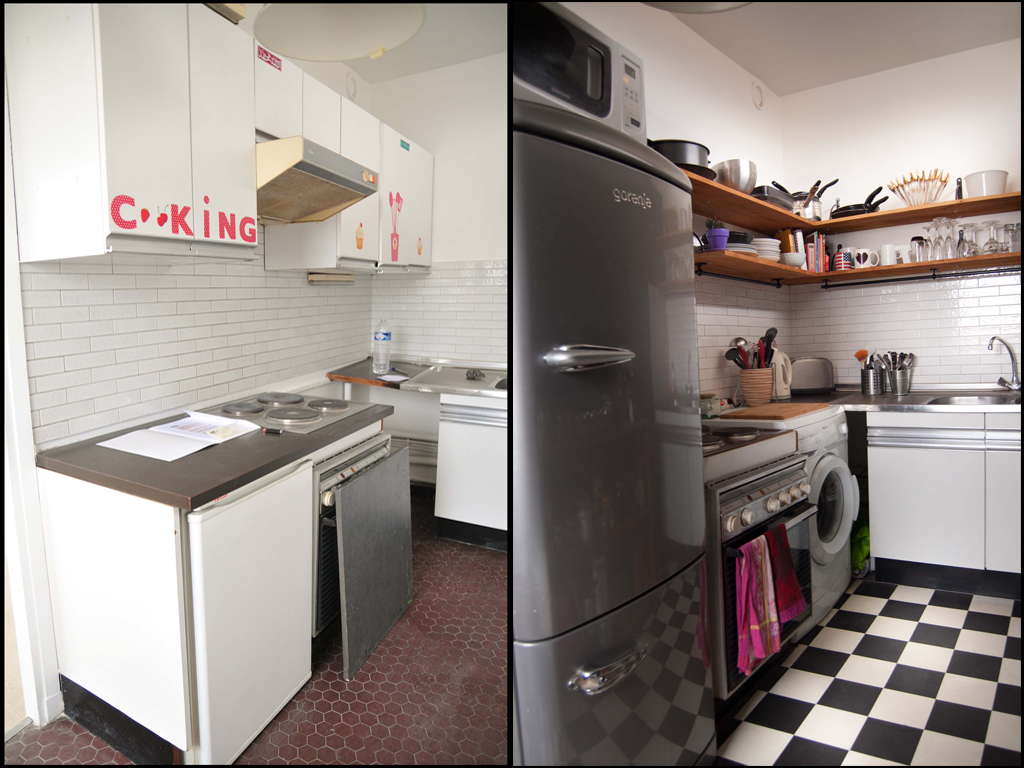
Destroying those cabinets was the highlight of my year I think. It felt so good getting rid of these horrible outdated things … And now it’s time to rejoice and welcome open-shelving, yay !
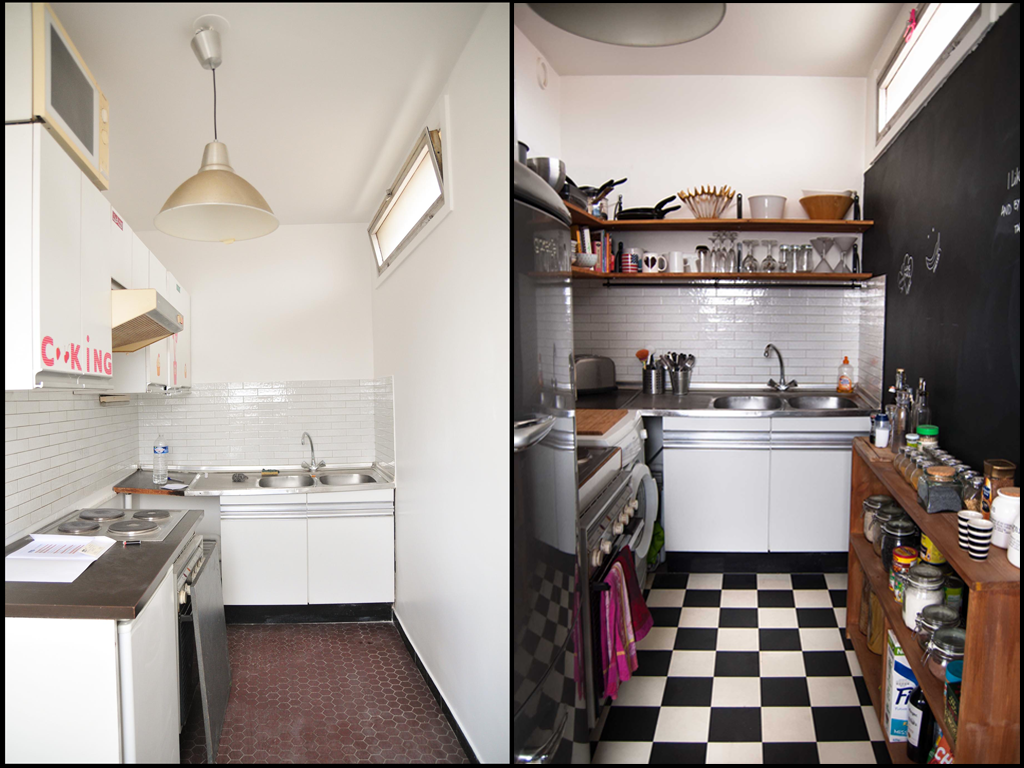
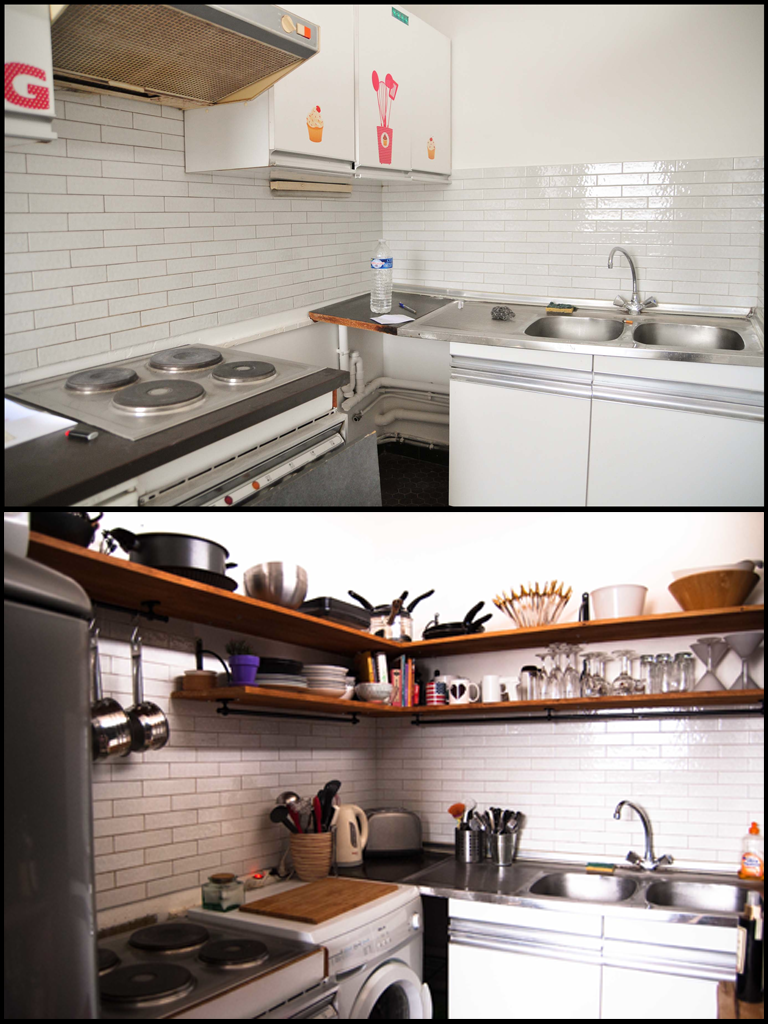
So let me refresh your memory. This is what we were working with :
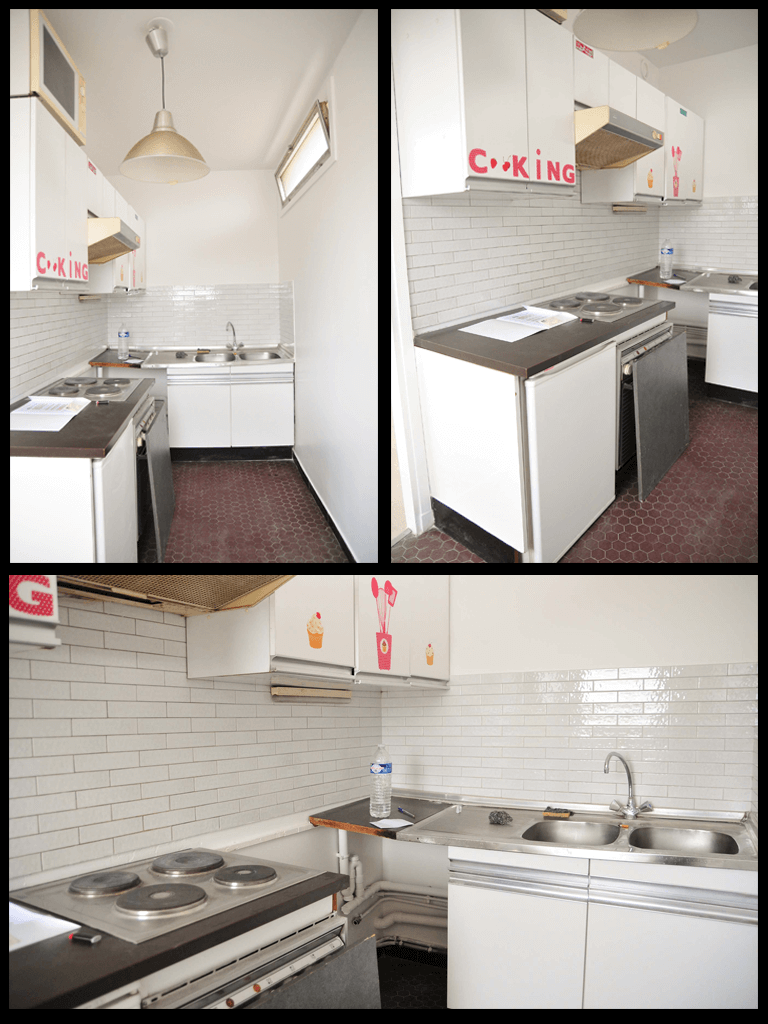 Once the cabinets were gone, I looked up and turns out this kitchen is huge !
It literally doubled in size in the blink of an eye, it’s more airy, there’s a ton of light now, and it’s just much more inviting.
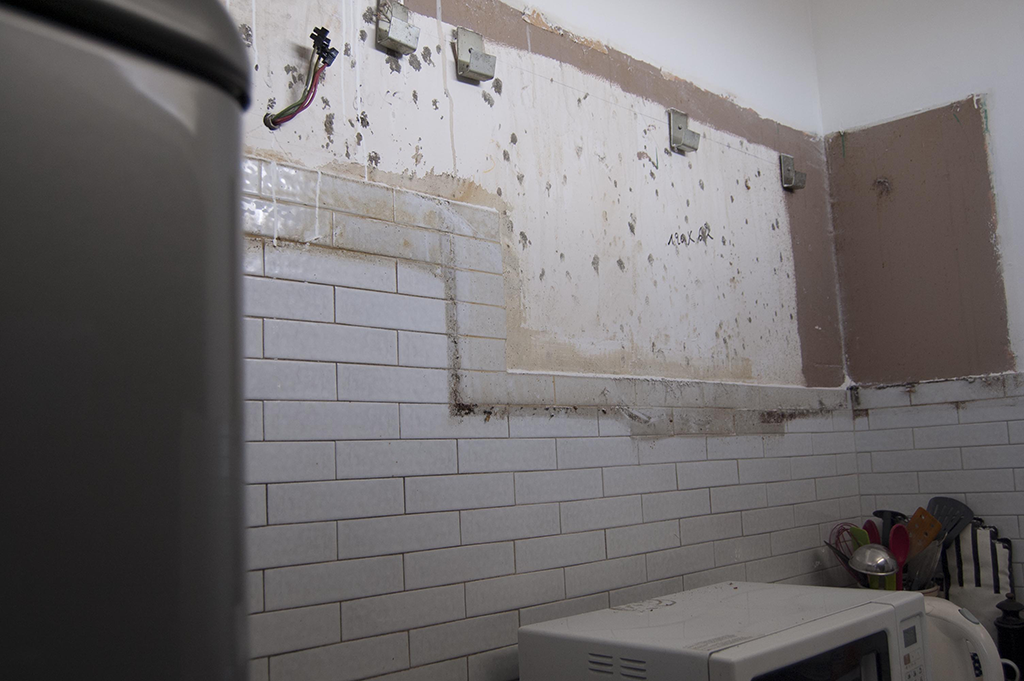 I had to scrape off the wall and paint and repaint it but otherwise, it’s all intact (phew !). You have no idea how my I enjoy this picture …
The open-shelves themselves were pretty easy to install, a couple brackets and screws and voilà ! Magic ! (Well, thank god for my very patient and helpful brother because without his help it may have taken a few days and many tears)
During the weekend I drew up some plans for arranging the shelves and so far I’m going to roll with that. If my habits change I’ll try to take notice and re-arrange. Sometimes we get impatient and want « the right design » right away but it’s actually good to wait it out a bit (if you can afford it) and live in the space to realize how you use it, and then you can make it more functional for your day-to-day.
Let’s get to the good stuff : the afters !
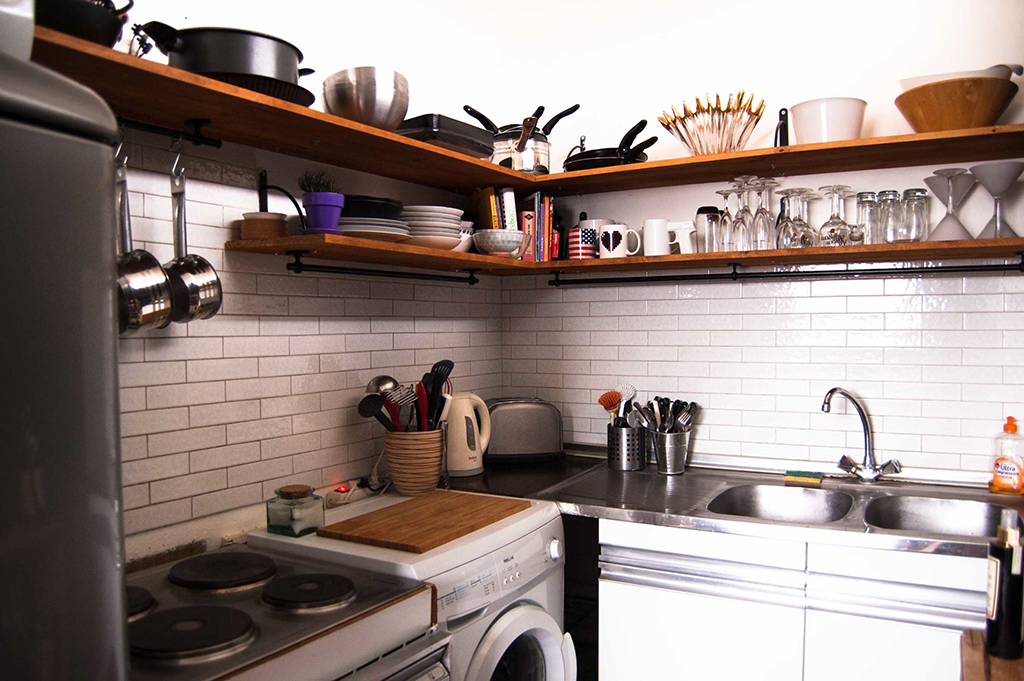
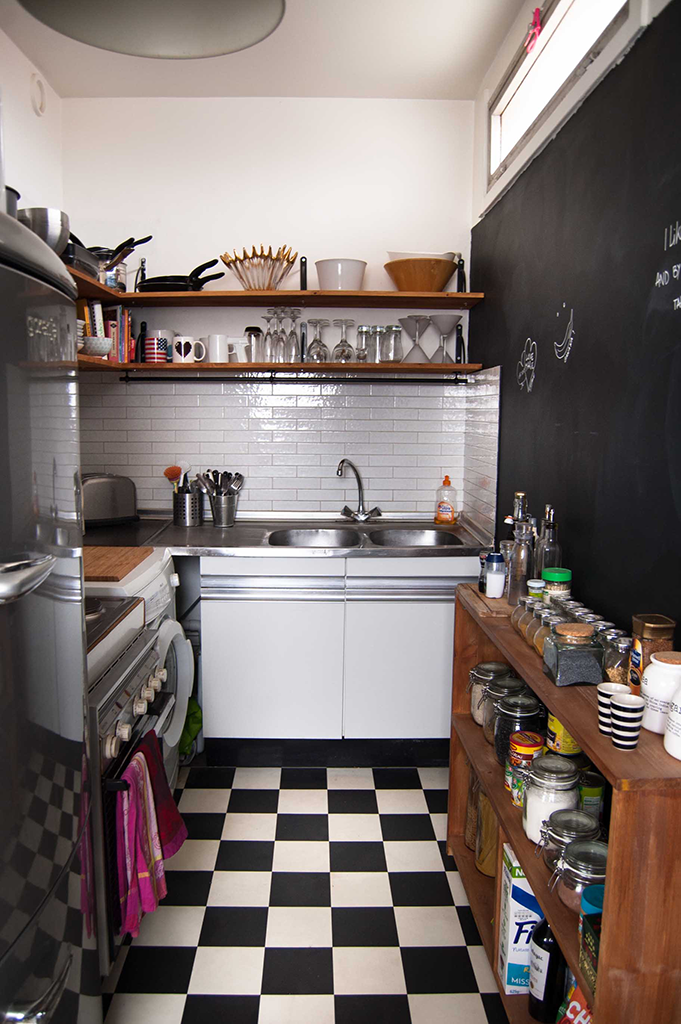 I decided to add rails under the bottom shelves to gain some much needed counter space. So I’ll be able to put up utensils, cups, and hopefully even a drying rack – although this is a total headache right now, thanks to Ikea switching collections ! The hooks don’t fit the new rails so I need to find a cool DIY solution.
Above the cooktop I added a smaller rail to hang my pots because it’s so damn cute ! And turns out, super practical, they can dry directly after being washed and are super accessible whenever I make pasta. Which is pretty much all the time…
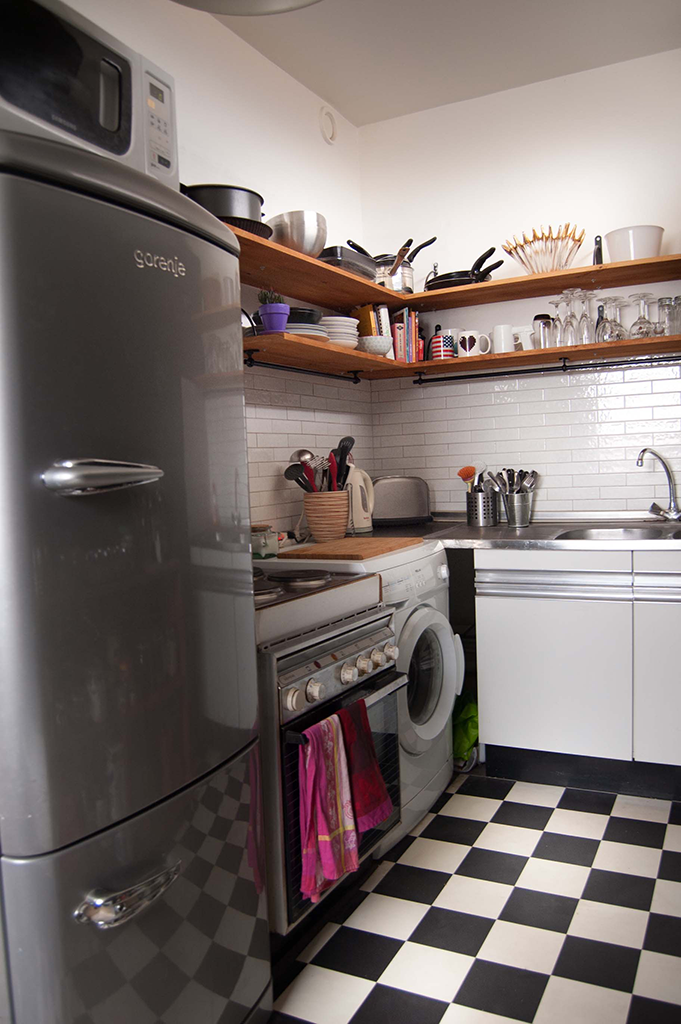
Now as great as this change is, let’s address the elephant in the room : the lack of counter-tops. Right now, this part of the kitchen is still a giant, annoying, disgusting mess. There’s not even a cohesive top, just a « sort of » base cabinet under the sink – which is uneven – a giant hole in the continuity for no apparent reason ( !!), and then basic crappy burners topping an antique oven, (which is actually pretty cool so it gets a pass).
So yeah. This is gonna take some work.
I actually have a pretty cheap and easy way to make a seamless counter top but I’m going to ask the landlord if he’s willing to go halfsies with me so that might take a while longer …
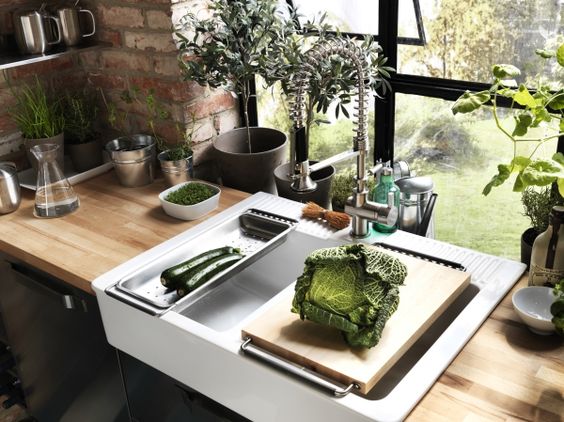
My goal is to get a nice wood counter top in there, with an electric smoothtop cooktop, and ditch this ugly basic-aluminum sink.
I’m eyeing this Ikea ceramic sink with its delightful curves. It’s not too expensive and it’s gorgeous in real-life. She will be mine …
 After that, we should be good to go, and in the meantime I’ll just have to decorate around it, and train my brain to not notice it. It’s not going to be an easy task let me tell you.
The other issue is the actual counter space. Like most people in France – and I know Americans aren’t as big users of them as we are -, I have a big, ugly, microwave that takes up a whole lotta room. But I can’t live without it.
So now I have to figure out where to put it and options are pretty limited (right now as you can see it’s on top of the fridge but I am of the tiny variety so it’s not ideal).
The corner of the counter top is great for a cute little nook, to put fresh herbs, wine bottles, what have you, but right now the angle is being eaten up by this cheap-ass sink so it’s ruining the actual space.
I definitely need a place for a big cutting board too. Right now I’m using my dining room table, which is turning out to be really fun when I’m entertaining because friends can join in or just sit down next to me and chat while I chop away.
I think a great option for small spaces is this cutting board from Ikea that goes over the sink. It’s a genius invention and pretty easy on the eyes too !
 Oh, Ikea, where would we be without you ?
The good news is I managed to fill the gap for now with my very first washing machine ! This, friends, is a total game changer for me. Suck it, laundromat ! I managed to get a great deal for 70 bucks. It fits like a glove, and not an inch more, so it better not flood my kitchen or I’ll end up in my downstairs neighbor’s kitchen before I can unplug it…
With the same wood and tint than the shelves, my brother made me a little extra storage and it’s coming in super handy ! My first thought of course was to add frames and candles and flowers because I saw an opportunity for styling but I had to remind myself that this was for actual practical storage. So instead a made a vinaigrette station ! I need to find a cool tray to put it in but these are the most basic needs for the salad-obsessed.
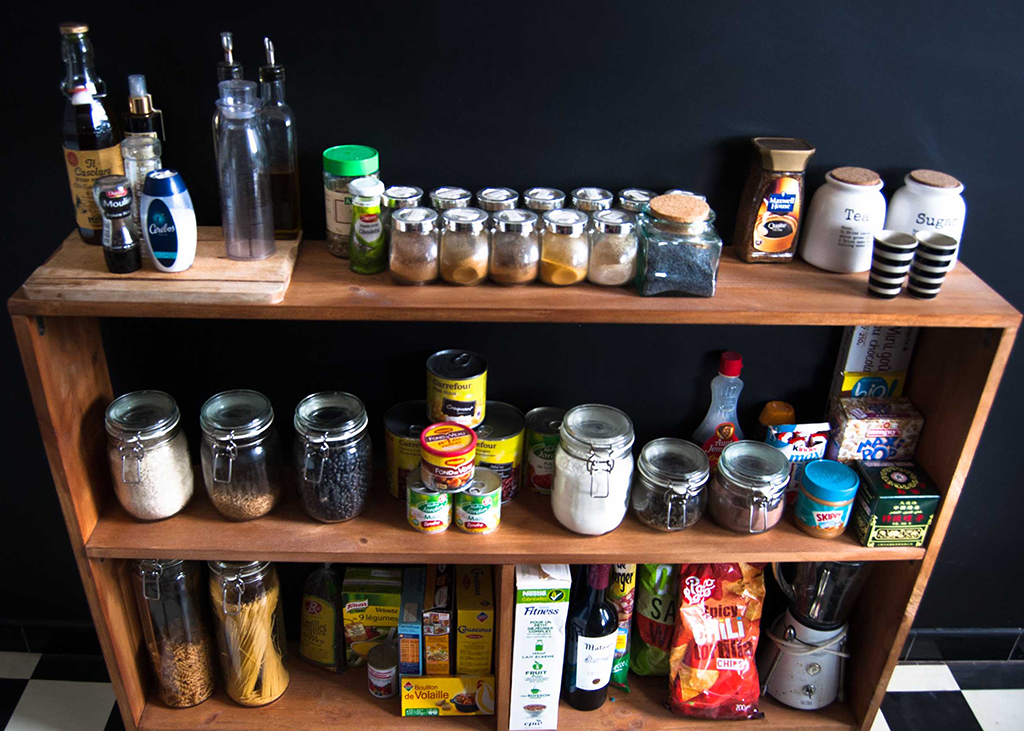 I also bought some cute spice jars at Ikea. I wanted to put them up somewhere, maybe on the rail, – there are great ideas for spice displays on Pinterest – but I haven’t decided on one yet so I just displayed them for easy access for now.
The rest of the kitchen is coming along, I’m thinking about more lighting options because once again the actual ceiling lamp is in a terrible, terrible, spot : above the fridge, and I do mean above, (I mean who designed this kitchen ? It’s a hot mess…)
The chandelier is up but it’s lighting for the nook, so when I’m doing dishes at the other end of the kitchen, I’m pretty much in the dark. So I’m looking to light up the side of the shelves with a couple of cool ceiling lamps, probably in a row.
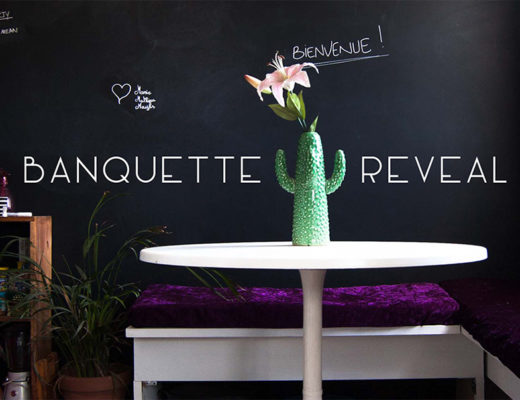
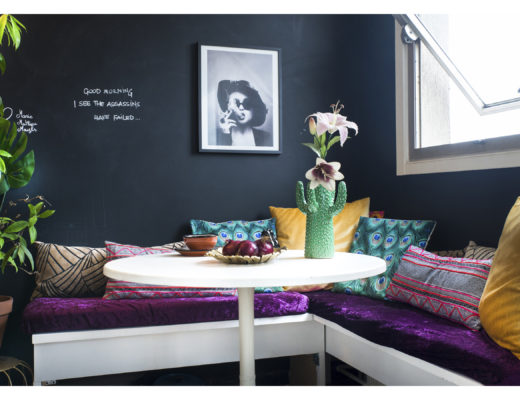
The banquettes will be done this week but it’s gonna take a few days to paint them properly so you’ll get an eyeful next Monday (on the actual Monday this time. You won’t get me twice, Monday !!) but I’ll sneak-peek it during the weekend ! It looks so good you guys, I can’t wait to show you !
Before I leave you, here’s some important info to brighten up your day : the breakdown !
Open-shelves (including brackets) : 55$
Extra Storage DIY : 46$
Rails & Accessories : 35$
Fridge & Washing Machine : 140$
That’s 276$ for the today’s makeover, and only 329$ total so far for the whole kitchen !! I mean, it makes a pretty big difference :
I hope this post inspired you, big city studio-dwellers, there’s hope for us yet !
Have a great Tuesday, because Tuesday is great and Monday you can suck it !
No Comments